Let’s get right into it. Low-stress training (LST) is, hands down, the best way to get a bigger harvest from your autoflowering cannabis plants without hurting them. It’s a total game-changer. Unlike high-stress methods that can shock an autoflower and stunt its growth—a disaster given their short life—LST is all about gentle guidance.
Why LST Is a Game-Changer for Autoflowers
If you just let a cannabis plant do its thing, it’ll grow like a Christmas tree. This is called apical dominance, where the plant funnels almost all its energy into one main stalk that shoots straight for the light. This leaves the lower branches stuck in the shadows, never really producing much.
Low-stress training flips that script. By carefully bending the main stem down and tying it horizontally, you trick the plant. The growth hormone, auxin, which normally pools at the very top, gets spread out more evenly through the plant.
This simple move tells the lower side branches to grow upward, basically turning them into their own main colas. So instead of one monster bud and a bunch of fluffy little “popcorn” nugs, you get a flat, wide canopy where every bud site gets a piece of the action.
Maximizing Your Light and Airflow
The real magic of LST for autoflowers comes down to light exposure. When you create that wide, open canopy, your grow light can hit spots deep inside the plant that would have been shaded. More light equals more energy for making buds. It’s a direct connection.
Here’s what that actually means for your grow:
- Bigger Harvests: By turning those little secondary bud sites into full-on colas, you can seriously pump up your final dry weight. It’s not crazy for growers to see yield boosts of 25-50% or more from a single plant.
- Higher Quality Buds: When the light is spread out evenly, all your buds develop at the same pace. You get a consistent harvest of dense flowers, not one great cola and a bunch of disappointing ones down below.
- A Healthier Plant: A flat, open canopy lets air move freely between the branches. This is a huge deal for preventing problems like mold and powdery mildew, especially if your humidity gets a little high.
The core idea is simple: instead of letting your plant grow like a Christmas tree, you carefully bend and tie down branches to create a flat, even canopy. This strategy exposes dozens of lower bud sites to direct light, transforming them into their own dense colas.
Perfectly Suited for the Autoflower Lifespan
Autoflowers are on a sprint, not a marathon. They go from seed to harvest in as little as 8-10 weeks. This is exactly why high-stress techniques like “topping” (snipping the main stem) can be a bad move. An autoflower just doesn’t have the time to recover from that kind of shock. Stunt its growth for a few days, and you’ve probably hurt its final size and yield for good.
LST, on the other hand, works with the plant. There’s no cutting, no major damage, and basically zero recovery time. You’re just gently guiding its growth, which makes it the perfect training partner for the genetics in today’s best autoflower seeds. If you’re just starting, getting your hands on some solid autoflower seeds is the perfect first step.
The growing interest in these techniques makes sense when you look at the cannabis seed market itself. Valued at roughly $1.29 billion in 2021, the global market is projected to have climbed past $2.25 billion by 2025. This explosion shows just how many growers are embracing smarter methods like LST to get the most out of their plants.
Assembling Your Simple LST Toolkit
Before you start shaping your autoflower, you’ll need a few simple things. The good news? You don’t need any fancy or expensive gear for LST. You probably have most of this stuff lying around, which makes it one of the cheapest ways to get a bigger harvest.
The whole point of LST is to be gentle, so your tools should be, too. It’s all about having a few simple, reliable items on hand to make the process easy on you and your plants. Getting everything together before your seeds even pop saves you from scrambling later on.
The Right Tools for Gentle Bending
Your most important tool is whatever you use to tie the branches down. The golden rule is to use something soft and flexible that won’t dig into the stems as they get thicker. Stay away from stuff like thin wire or fishing line—they can easily slice into the plant and cause serious damage.
Instead, look for one of these options:
- Soft Plant Ties: This is my go-to. It’s basically a thin, bendable wire wrapped in soft rubber or foam. It’s strong enough to hold a branch where you want it but won’t chafe or cut the stem.
- Pipe Cleaners: A classic for a reason! They’re cheap, easy to find, and their fuzzy texture is perfect for LST. You can also reuse them from one grow to the next.
- Thick Twine or Yarn: In a pinch, a thick, soft twine can do the job. Just be extra careful not to pull it too tight, as it can still cut into the branch if you’re not paying attention.
Your goal is to anchor, not strangle. Always leave a little slack in your ties to allow the branch to expand. A tie that’s too tight can cut off nutrient flow, defeating the whole purpose of training.
Anchoring Your Plant Effectively
Once you’ve got your ties sorted, you need something solid to attach them to. This is where your choice of pot really matters. A plain plastic pot with no lip can make things tough, but a few other options make LST a total breeze.
Fabric pots are a fantastic choice because you can just poke a safety pin or your tie right through the material anywhere you need an anchor. Plastic pots with a nice, thick rim also work great, giving you a sturdy edge to clip onto. If you’re stuck with a basic pot, no sweat—just drill a few small holes around the top edge before you fill it with soil.
Here are a few other household items that make excellent anchor points:
- Binder Clips: Simply clip these onto the rim of your pot for an instant, movable anchor point.
- Garden Stakes: Small wooden or bamboo stakes pushed into the soil near the pot’s edge work perfectly for tying branches down.
- A Small Hand Drill: The perfect tool for adding your own custom anchor points to plastic pots, giving you total control.
To make it even easier, here’s a quick rundown of the gear you’ll want to have on hand.
Essential LST Toolkit for Autoflowers
| Tool | Primary Use | Pro Tip |
|---|---|---|
| Soft Plant Ties or Pipe Cleaners | Gently tying down the main stalk and side branches. | Cut them into 4-6 inch lengths so they’re ready to go when you need them. |
| Fabric Pot or Pot with a Rim | Provides a sturdy base and easy anchor points. | Fabric pots are great because you can pierce them anywhere to create a new anchor. |
| Binder Clips or Safety Pins | Creating adjustable anchor points on the pot’s rim. | Binder clips are super versatile and can be moved easily as the plant grows. |
| Small Garden Stakes | Creating anchor points directly in the soil. | Useful for early LST when branches are too short to reach the edge of the pot. |
| Small Scissors | Snipping ties and maybe some light defoliation. | Keep a pair dedicated to your garden to avoid spreading contaminants. |
Having these simple items ready to go will make your entire LST experience smooth and successful. You’ll be able to react quickly as your plant grows, ensuring you get that perfect, even canopy.
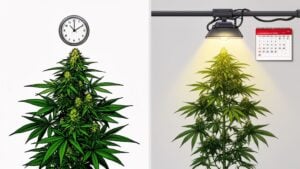
When’s the Perfect Time to Start LST?
Timing is absolutely everything with low-stress training autoflowers. I get it—this is the one step that makes a lot of new growers nervous. Start bending too early, and the seedling is just too fragile and can easily snap. But if you wait too long, the stems have already started to harden up, and you’ve missed your chance to really shape the plant.
The key is finding that sweet spot where the plant is strong and growing fast, but still nice and flexible. Nailing this timing takes all the stress out of the process and sets you up for a much bigger, better harvest.
Let Your Plant Tell You When It’s Ready
Forget about counting days on a calendar. The best way to know when to start is to just watch your plant—it’ll give you all the signals you need. The most reliable sign is the number of nodes. A node is just the junction on the main stem where a new set of branches and leaves pops out.
The ideal moment to begin LST is when your autoflower has developed between 4 to 5 nodes. This usually happens around week two or three after it sprouts. By this point, the plant has a solid root system and a main stem that’s both flexible enough to bend and tough enough to handle it.
Keep an eye out for these visual cues:
- A Sturdy Stem: The main stem should feel solid, not like the flimsy, fragile stem of a brand-new seedling.
- Vigorous Growth: You should see new leaves popping up almost daily. That’s a clear sign your plant is in its explosive vegetative stage.
- Decent Height: The plant needs to be tall enough—usually around 6-8 inches—so you can actually bend the top over without it touching the soil.
If you’re on the fence, it’s always better to wait another day or two. A slightly more mature stem is way better than a broken one.
Why That 4-5 Node Stage Is the Magic Number
Starting at this specific point isn’t just some random rule; it’s all about how the plant actually grows. The top of the main stem is still soft and full of energy, making it super responsive to training.
When you bend that main stem over, you’re messing with the flow of growth hormones called auxins, which are responsible for that “Christmas tree” shape. This simple bend quickly tells the plant to send more energy to the lower side branches, encouraging them to shoot upwards and become their own main colas.
Key Takeaway: Waiting for that 4th or 5th node gives you the perfect balance of strength and flexibility. The plant is established and ready for your guidance, but it hasn’t yet set a rigid structure. It’s the prime time to start shaping your canopy.
This early training is especially important for autoflowers. Their veg window is incredibly short—sometimes only 3-4 weeks before they flip to flowering all on their own. You have to get your plant’s structure set before that happens. Understanding how light influences this rapid growth is also helpful. To get a better handle on this, you can learn more about the ideal cannabis light schedule for seedlings.
What if You Missed the Window?
So, what happens if life got in the way and your plant is well past the 5-node mark? First off, don’t freak out. You haven’t completely missed your shot, but you will need to change your approach.
An older plant will have a much stiffer, woodier main stem. Trying to force a sharp 90-degree bend now is just asking for a heartbreaking snap.
Instead, you need to be much more gentle and patient:
- Warm the Stem: Gently roll the part of the stem you plan to bend between your fingers for a minute or so. This little bit of friction warms it up and makes it slightly more pliable.
- Bend in Stages: Don’t try to get it all the way down in one go. Bend it just a little, tie it in place, and then come back the next day to tighten the tie and increase the angle a bit more. Repeat over a few days.
- Focus on the Side Branches: If the main stem is just too rigid to bend safely, shift your focus. Instead of wrestling with the main stalk, start pulling the primary side branches outward and down to create a more open, bowl-like canopy.
While starting late isn’t ideal, this modified approach is a whole lot better than doing nothing. Even just opening up those side branches will dramatically improve light exposure and airflow, which will still lead to a much better harvest than an untrained plant.
A Hands-On Guide to Bending and Tying
Alright, let’s get our hands dirty. This is where the real fun begins. We’ve covered the why, but now it’s time to actually bend and shape your plant. Think of it less like a rigid science and more like sculpting. The keys are a gentle touch, a bit of patience, and staying on top of it.
That first bend is everything. It’s the move that sets the stage for your plant’s entire structure. Your goal is to convince that main stem, which is programmed to shoot straight up, to grow horizontally instead. This one simple action breaks the apical dominance we talked about and tells the plant to start sending growth energy out to all the side branches.
The Crucial First Bend
Once your autoflower has 4-5 nodes and looks healthy, it’s go-time. Here’s a little trick I’ve picked up over the years: before you bend anything, gently roll the part of the main stem you plan to train between your thumb and forefinger for about 30 seconds. The warmth and gentle friction make the stem surprisingly more pliable and reduce the risk of it snapping.
Now, with one hand holding the base of the plant steady at the soil line, use your other hand to slowly guide the top of the main stem over. You’re not trying to break it; you’re aiming for a smooth arc, ideally getting it to a 90-degree angle so the top is parallel with your soil. If it feels too stiff, don’t force it. Slow and steady is the name of the game.
Once you have it in position, use a soft plant tie to hold it there. Anchor one end of the tie to the stem—leaving a small loop so you don’t choke it as it grows—and the other end to the rim of your pot. You can also drill small holes in your pot’s rim for more anchor points. The top of the plant should now be physically lower than the side shoots just below it. That’s the magic signal.
This visual shows you exactly what to look for when timing that critical first step.
As you can see, that “Just Right” window is key. The plant is strong enough to handle the stress but still young and flexible enough to be shaped without putting up too much of a fight.
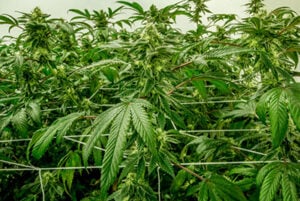
Managing the Side Branches
With the main stem tied down, you’ll see something amazing happen within just a day or two. All those little side shoots will suddenly turn upwards and start reaching for the light. This is the proof that your LST is working perfectly.
From here on out, your job is to manage these new “tops” as they grow. You’ll want to gently pull them down and away from the center of the plant, creating a kind of spiral or starburst pattern when you look at it from above. Each time a branch gets long enough, just secure it with another soft tie, always trying to keep all the growing tips at roughly the same height.
This continuous process is what builds that wide, flat canopy where every single bud site gets a front-row seat to the light.
- Work Outward: Always guide branches away from the main stem, not across other branches. This prevents a tangled mess and keeps air flowing freely.
- Create Space: Try to leave a little room between each tied-down branch. This is crucial for letting light penetrate deep into the plant.
- Be Consistent: Check on your plant every day or two. Autoflowers grow shockingly fast, and a branch that was fine yesterday might be a few inches too tall today. Small, frequent adjustments are far better than one big, stressful training session.
Think of yourself as a sculptor. You’re not forcing the plant into an unnatural shape; you’re simply guiding its natural instinct to grow toward light in a way that maximizes your final harvest.
Real-World Scenarios and How to Handle Them
It’s one thing to describe the perfect scenario, but plants have a mind of their own. Here are a couple of common issues you’ll almost certainly run into.
What if a branch feels too stiff to bend?
Whatever you do, don’t force it. This usually happens when you wait a day or two too long. Instead of trying to crank it down to a full 90 degrees, just aim for a gentle 45-degree angle. Secure it there. Come back the next day, and you’ll find you can tighten the tie a little more. Over two or three days, you can coax even stubborn branches into position without risking any damage.
How do you manage an extra bushy plant?
Some strains, especially those with heavy indica genetics, just love to grow dense. If your plant is becoming a tangled bush of leaves stacked on top of each other, you can use a simple technique called leaf tucking. It’s exactly what it sounds like: find any large fan leaves that are shading a bud site below and gently tuck them underneath the branch. This is a great, non-damaging way to improve light exposure without resorting to defoliation, which can be too much stress for some autoflowers. Your goal is to keep that canopy even all the way through the vegetative stage, setting yourself up for an incredible flowering phase.
Common LST Mistakes and How to Fix Them
Look, even growers with years under their belt have heard that dreaded snap of a branch. It happens. When you’re working with autoflowers, the timeline is so compressed that any mistake feels like a big deal. But don’t let that intimidate you.
The trick is knowing the common mistakes so you can avoid them. And if you do screw up, knowing how to recover quickly is what separates a good harvest from a disappointing one.
Going a Little Too Hard
By far, the number one mistake is just being too aggressive. You get in the zone, trying to bend a branch into that perfect spot, and you push it just a little too far. With a photoperiod plant, a broken branch is a minor setback; it has plenty of time in veg to heal. An autoflower doesn’t have that luxury. Every day counts, and a major break can seriously mess with its potential.
So what do you do when you hear that crack? First, don’t panic. If the branch is just kinked or partially broken but still hanging on, it’s almost always fixable. This is where a roll of tape becomes your best friend in the grow room.
- Make a splint: Grab some duct tape, electrical tape, or even thick masking tape. Anything that can provide firm support.
- Set the break: Gently maneuver the branch back to its natural position. Wrap the tape securely around the break, creating a little cast. For extra support, you can even tape a small piece of a toothpick or a plant tie alongside it.
- Let it heal: Just leave it alone for a week or two. You’ll be surprised. The plant will often form a hard, woody knuckle right at the break point and be stronger than ever.
If the branch is completely severed, it’s a lost cause. Just make a clean cut to remove the dangling part. The plant will refocus its energy on the remaining growth.
Using the Wrong Supplies
This one seems minor, but it can cause real problems. Using thin materials like string, fishing line, or bread ties is a classic rookie mistake. As the stems thicken up—and they do it fast—these thin ties can slice right into the plant tissue, restricting the flow of water and nutrients. It’s like putting a tourniquet on a branch.
Always use soft, rubber-coated plant ties or even thick, fuzzy pipe cleaners. When you make your loop around the stem, make sure it’s loose enough to allow for future growth. You’re guiding the branch, not strangling it.
The “Set It and Forget It” Approach
LST is an ongoing conversation with your plant, not a one-time thing. A common mistake is to do the initial tie-down, feel proud of your work, and then walk away for a week. You’ll come back to a tangled mess. Autoflowers grow with explosive speed during their vegetative stretch.
The ties you put in place on a Monday might be too tight or pulling at a completely useless angle by Wednesday. You absolutely have to check on your plants daily.
Make small, gentle adjustments as the plant grows. This constant, gentle guidance is the very definition of “low-stress.” It’s way more effective than trying to wrestle the plant back into shape after a week of neglect. Your goal is to keep all those budding tops at roughly the same height, creating a beautiful, even canopy.
The growing interest in these hands-on cultivation techniques is a big reason the cannabis seeds market is booming. In 2024, the U.S. market was valued at $164.55 million, and it’s projected to hit a staggering $505.03 million by 2032. It just goes to show how many growers are getting serious about maximizing their plant’s potential. You can dig into more of this market data over on technavio.com.
Starting Too Late
We’ve already talked about the sweet spot for starting LST, but what if you miss it? Life happens. If you find your plant is already in late veg and the main stem has started to get woody and rigid, do not try to force a 90-degree bend. That’s just asking for a snap.
If you’re late to the party, just change your strategy. Instead of a dramatic bend on the main stalk, focus your efforts on gently pulling the side branches outward and downward. Opening up the plant’s structure to let more light into the lower sections is still a huge win. It’s not the “perfect” LST canopy, but it’s a whole lot better than doing nothing—or worse, snapping your main stem right in half.
Ready to put this knowledge to the test with some top-tier genetics? At Growers Choice Seeds, we’ve got a massive selection of premium autoflower seeds perfect for your next LST project. And with a 90% germination guarantee, you can start your grow with confidence. Find the perfect strain for your setup today at https://www.growerschoiceseeds.us.
FAQs
When Is the Right Time to Stop LST?
You’ll want to stop all the major bending and tying once your plant really starts its flowering stretch. This is usually the first 2-3 weeks after you see the first little white pistils showing up. During this phase, the stems start to harden and get woody, making them much more brittle and prone to snapping.
At this stage, the plant’s main structure is pretty much set, and it needs to pour all its energy into developing those dense, frosty buds. You can still make tiny adjustments—like tucking a big fan leaf that’s blocking light to a lower bud site—but the heavy structural work is done. It’s time to let the plant focus on what it does best.
What if I Accidentally Snap a Branch?
First, don’t sweat it. It happens to the best of us, truly. If the branch is just kinked or bent but still attached, it will most likely heal itself and form a hard, thick ‘knuckle’ at the bend. These knuckles can even be a good thing, sometimes improving the flow of nutrients to that branch.
If it’s a cleaner break but the branch is still hanging on, you can play plant surgeon. Grab some duct or electrical tape and a small splint, like a toothpick or a short piece of a pipe cleaner. Carefully line up the broken parts, wrap the “cast” securely, and give it a week or two to mend. You’ll be surprised how resilient they are.
And if the branch is completely severed? Just make a clean snip with sterile scissors to remove the damaged bit. The plant will simply redirect its energy elsewhere. No biggie.
How Often Should I Adjust the LST Ties?
The short answer is pretty often. I’d recommend peeking in on your plants daily, especially once they hit that explosive growth spurt in veg. Autoflowers can grow at a shocking pace—a branch you bent down yesterday could be reaching for the sky again today.
You won’t have to re-tie everything every single day, of course. But a quick daily check allows you to make tiny, gentle adjustments as needed. This constant fine-tuning prevents the need for a big, risky bend down the line, which seriously cuts down on the risk of snapping a branch.
Consistency is your best friend here. A few minutes of minor adjustments every day or two are far more effective—and safer—than one major training session per week.
Can I Combine LST with Topping on My Autoflower?
This is probably the most common question, and my honest-to-goodness advice is to stick with one. For autoflowers, that one should almost always be LST only.
Here’s the deal: High-stress techniques like topping mean you’re actually cutting the plant. This forces it to stop growing and spend precious time and energy healing the wound. An autoflower is working against the clock; its whole life cycle is on a fast track determined by its genetics. It simply doesn’t have the long veg period to bounce back from that kind of trauma.
Losing even a few days to recovery can mean a smaller plant and, ultimately, a lighter harvest. LST is the way to go because it gently coaxes the plant into that wide, multi-cola canopy without the shock. This lets your auto stick to its rapid growth schedule. If you want a deeper look at the mechanics, our guide comparing topped vs non-topped plants breaks it down perfectly.