Auto")
 Auto")


Let’s be real, most problems you’ll run into with cannabis seedlings trace back to an unbalanced environment. The usual suspects? Overwatering, crappy lighting, and the wrong temperature. These slip-ups show up as yellowing leaves, weak stems, or just a general failure to thrive—all clear signs your little plants are struggling. Nailing these common mistakes early is the secret to helping them grow into healthy, heavy-yielding plants.
Why Your Cannabis Seedlings Are Unhappy
We’ve all been there. You check on your brand new seedlings, full of hope, only to find them looking… sad. It’s a gut-punch moment when you start freaking out about how much you spent on cannabis seeds and how many of them may be duds. In these first few weeks, your plants are incredibly fragile, and they won’t hesitate to let you know when something’s off.
Think of the seedling stage as pouring the foundation for a house. A shaky start here almost always spells trouble later on.
The good news is that seedlings are surprisingly good at communicating. They can’t talk, but their leaves and stems give you clear visual hints. Are the leaves droopy and dark? They’re probably drowning. Is the stem long and lanky, looking like it might just give up and fall over? It’s desperately stretching for more light. The real skill is learning to read these signs and acting fast.
Decoding the Signs
Before you start messing with your lights or mixing up a nutrient solution, just stop and look. Most seedling issues are surprisingly simple to fix, but jumping to the wrong conclusion can make things a whole lot worse. Get up close and ask a few questions. Is the soil heavy and wet, or is it bone dry? Are the leaves yellow, pale, or sporting crispy brown edges? Is the stem strong, or is it thin and weak? Each of these symptoms points to a different problem.
Let’s walk through the most common culprits you’re likely to face. This isn’t about deep-diving into plant science; it’s about practical diagnosis that gets results.
- Environmental Stress: This is the big one. Seedlings need a “Goldilocks zone” for temperature and humidity. Too hot, too cold, too damp, or too dry, and you’ll see it in their posture almost immediately.
- Watering Woes: I’ve seen more seedlings killed by kindness (overwatering) than by neglect. Their tiny roots can’t handle sitting in a swamp. Waterlogged soil cuts off oxygen and basically invites root rot and other nasty problems to the party.
- Light Issues: Light is food for your plants, but getting the intensity and distance right is a balancing act. Too little light forces them to “stretch” and get leggy, while too much can burn their delicate new leaves.
If you remember only one thing, make it this: resist the urge to constantly fuss over your seedlings. Most of the time, the solution is to do less, not more. Give them a stable, happy environment and let them do their thing.
Quick Diagnosis for Common Seedling Issues
To make troubleshooting even faster, I’ve put together a quick-reference table. Use this as your first line of defense to match what you’re seeing with the most likely cause and the first, most important, corrective step.
This simple chart can help you stop a small issue from becoming a big one.
| Symptom | Most Likely Cause | First Step to Fix It |
|---|---|---|
| Yellow, Droopy Leaves & Wet Soil | Overwatering | Stop watering. Let the soil dry out completely. Check that your pots have good drainage. |
| Long, Thin, Stretchy Stem | Insufficient Light | Lower your light source a bit closer to the plants or increase its intensity. |
| Brown, Crispy Leaf Tips | Nutrient or Light Burn | If you’ve started feeding, flush with plain pH-balanced water. If not, move the light up a few inches. |
| Stem Pinched at Soil Level, Falls Over | Damping-Off (Fungal Disease) | Get a small fan for gentle air circulation and lower the humidity. Sadly, this is often fatal. |
| Pale or Yellow Leaves & Dry Soil | Underwatering or pH Lockout | Give the plant a thorough watering. If it doesn’t improve, it’s time to check the pH of your water. |
Of course, starting with great genetics gives you a huge advantage right out of the gate. High-quality cannabis seeds from a reliable source like Growers Choice Seeds tend to produce tougher, more vigorous seedlings that can power through minor mistakes. It’s like building your house on solid bedrock—everything that comes after is just easier.
How to Beat Damping-Off Before It Starts
Let’s have a frank discussion about damping-off. It’s one of those problems that sounds almost harmless, but it’s a silent killer that can wipe out an entire tray of promising sprouts practically overnight.
You go to bed with a nursery full of happy, green shoots and wake up to a heartbreaking scene: tiny, lifeless stems bent completely over at the soil line. It’s incredibly frustrating and, for the affected seedling, almost always fatal.
The culprit isn’t a single villain but a whole gang of soil-borne fungi—think Pythium and Fusarium—that thrive in very specific conditions. These microscopic troublemakers attack the seedling’s tender stem right where it meets the soil, turning it mushy and weak until it just can’t hold itself up anymore. Once you see that dreaded pinch, it’s game over for that plant.
This is exactly why the old saying “an ounce of prevention is worth a pound of cure” is gospel for growers. You can’t really fight damping-off once it shows up. What you can do is make your grow space an incredibly unwelcome place for it to ever get started.
Creating a No-Go Zone for Fungus
Think of your seedling tray as a tiny ecosystem. To shut down damping-off, you need to control the climate and eliminate the two things these fungi absolutely adore: stagnant air and soggy, waterlogged soil. It’s really that simple.
These fungi are just opportunists, waiting for you to create the perfect swampy, still environment for them to flourish.
Your mission is to do the complete opposite. You want to cultivate a space with a gentle breeze and use a growing medium that stays moist, not saturated. A little bit of airflow and a mindful approach to watering are your two most powerful weapons in this fight.
The key takeaway is this: Damping-off is almost entirely preventable. Focus on creating a clean, airy, and properly watered environment from day one, and you’ll likely never have to see its devastating effects.
Here’s a breakdown of the practical, no-fuss steps you can take to build a fortress against this all-too-common fungal assault.
Your Damping-Off Prevention Checklist
Forget about complicated chemical treatments. Your best defense is just a clean, well-managed setup from the very beginning.
- Start with a Clean Slate: This part is non-negotiable. Before you even think about putting seeds in soil, make sure every pot, tray, and humidity dome is thoroughly cleaned. A simple scrub with hot, soapy water followed by a good rinse is often enough. For extra security, a quick wipe-down with a diluted hydrogen peroxide solution will kill any lingering fungal spores.
- Use Sterile Growing Media: Whatever you do, don’t just scoop up dirt from your backyard. That soil is teeming with life, including the very fungi you’re trying to avoid. Always start your seeds in a fresh, sterile medium like a soilless seed-starting mix, coco coir, or rockwool cubes. This gives your seedlings a clean environment to establish roots without battling pathogens from the get-go.
- Get the Air Moving: This is a huge one. Stagnant, humid air is a five-star resort for fungi. A small, inexpensive oscillating fan set on its lowest speed and placed a few feet away is all you need. The goal isn’t to blast your seedlings with a hurricane; you just want to create a gentle, constant breeze that circulates air, strengthens their stems, and helps the soil surface dry out a bit.
- Don’t Drown Your Seedlings: We’ll dive deeper into watering soon, but it’s absolutely critical for preventing damping-off. Let the top layer of your growing medium dry out slightly between waterings. Bottom-watering is a fantastic technique here—just place your seedling pots in a tray of water and let them soak it up from the bottom. This keeps the topsoil and the vulnerable stem base much drier.
Damping-off is no joke; it can wipe out up to 90% of seedlings in poorly managed setups. The prevention stats really show how effective these simple measures are. Using sterile mediums like rockwool can slash its incidence by 85%, and proper bottom-watering can cut the risk by another 70%. You can explore more about cannabis seedling vulnerabilities and find additional insights in our guide to common plant diseases and pests.
Stop Loving Your Seedlings to Death with Water
It sounds completely backward, but sometimes the best thing you can do for your new cannabis seedlings is to just walk away from the watering can. It’s a classic rookie mistake: we want to nurture our little plants so much that we end up killing them with kindness. More often than not, that kindness comes in the form of too much water.
At the heart of the problem is a simple fact: roots need to breathe. Just like us, they need oxygen to function. When the soil stays constantly soaked, those essential air pockets disappear, and the roots literally start to suffocate. This creates the perfect breeding ground for root rot, a nasty fungal issue that turns strong, white roots into a brown, mushy mess.
This isn’t a small issue. A 2023 grower poll revealed that overwatering is suspected to cause root rot in a staggering 75% of beginner grow attempts. The fix is surprisingly simple: letting just the top inch of soil dry out between waterings can boost seedling survival rates to 95%.
Is It Thirsty or Drowning?
This is where many new growers get tripped up. The most obvious sign of an overwatered seedling is droopy, curling leaves. But wait, doesn’t an underwatered plant do the exact same thing? Yes, but there’s a key difference you can feel: the soil and the leaves themselves.
An overwatered plant’s leaves will droop, but they’ll feel heavy and look swollen. The soil, of course, will be damp to the touch. In contrast, an underwatered plant’s leaves will be wilted, thin, and feel papery or lifeless. The soil will be bone dry. Getting this diagnosis right is half the battle.
The golden rule I’ve learned over the years is simple: when in doubt, wait a day. Seedlings are far more resilient to a little dryness than they are to sitting in a swamp.
How to Water Like a Pro
Forget about a rigid watering schedule. “Watering every other day” is a recipe for disaster because your plant’s needs change constantly with temperature, humidity, and its own growth rate. You need to let the plant tell you when it’s thirsty.
Here are a couple of my favorite, foolproof methods:
- The Weight Test: This is the most reliable trick in the book. After you’ve watered a seedling thoroughly, pick up the pot and get a feel for its weight. Pick it up every day after that. When it feels noticeably lighter—almost airy—it’s time for another drink.
- The Finger Test: The old classic still works. Just stick your finger about an inch deep into the soil. If you feel any moisture at the tip, hold off. If it’s dry, your seedling is probably ready.
When you do water, be thorough. Pour water slowly until a small amount drains from the bottom of the pot. This makes sure the entire root zone gets hydrated and helps flush out any built-up salts. Then—and this is the most important part—don’t even think about watering again until that pot feels light.
The Right Home for Healthy Roots
The container you choose plays a massive role in preventing overwatering from the start. Standard plastic pots are fine, but they aren’t very forgiving. No matter what you use, it must have drainage holes. No exceptions. Without them, you’re just creating a tiny bathtub for your roots to rot in.
For an almost foolproof setup, I always recommend fabric pots or “smart pots.” These containers are made from a breathable fabric that completely changes the game for root health.
They offer two massive benefits:
- Air Pruning: When roots hit the fabric wall, the air naturally “prunes” them, encouraging the plant to grow a denser, more fibrous root ball instead of circling aimlessly.
- Superior Drainage: It’s incredibly difficult to overwater in a fabric pot. Excess water wicks away right through the material, not just out of the bottom holes.
Making this one simple switch can save you a world of headache, especially if you’re just starting out. It provides a natural buffer against our instinct to overwater and gives your seedlings the oxygen-rich environment they need to thrive.
The Delicate Art of Feeding Young Plants

Figuring out when and what to feed your brand-new cannabis seedlings can feel like walking a tightrope. It’s a classic case where you can kill them with kindness. If you’re too timid with nutrients, your seedlings might just stall out. But if you go too heavy, you’ll see those dreaded crispy, burnt leaf tips—the tell-tale sign of nutrient burn.
Let’s clear the air on this. A freshly sprouted seedling comes with its own packed lunch. Those first two little round leaves, the cotyledons, are loaded with all the energy the plant needs to get through its first week or two. Seriously, they don’t need a single drop of added nutrients during this time.
Your only job right now is to give them water and light. Rushing in with fertilizers is one of the fastest ways to cause problems that were completely avoidable.
Why Less Is More for Seedling Nutrition
Picture a seedling’s root system—it’s incredibly tiny and fragile. When you pour in strong fertilizers, you’re essentially force-feeding a baby more than its delicate system can possibly handle. The salts in the nutrients quickly build up in the soil and overwhelm the roots, which leads directly to nutrient burn.
You’ll spot it right away. The very tips of the leaves will turn a dark, crispy brown, and sometimes they’ll even curl up like a claw. This is your plant practically screaming that it’s been overfed.
Over-fertilizing is a massive problem, especially for new growers. Some research shows that nutrient burn from feeding too early or too strong can wipe out up to 55% of cannabis seedlings in hydroponic home setups. The symptoms usually pop up within a week or two, all because the nutrient solution was way too potent for such young plants. A simple rule of thumb? Stick to a 1/4 strength nutrient solution at the absolute most, and don’t even think about it until you see the first couple of sets of true leaves.
If you do mess up and overdo it, flushing the soil with plain, pH-balanced water can make a huge difference in saving the plant. You can dive deeper into how nutrient concentrations affect young plants in this study on plant nutrition.
My personal rule: don’t even think about feeding your seedlings until they have at least two or three sets of real, serrated leaves. The plant will tell you when it’s hungry—usually when the cotyledons start to yellow and fade away.
The Unsung Hero of Nutrient Uptake: pH
Even if you get the nutrient strength absolutely perfect, there’s another piece of the puzzle that many growers miss: pH. You could be feeding your plant the best organic food on the planet, but if the pH is out of whack, the plant simply can’t eat it.
Think of pH as the key that unlocks the door to nutrient absorption.
For soil grows, you’re aiming for a pH range of 6.0 to 6.8 in your water. In this sweet spot, all the essential nutrients are readily available for the roots to soak up. If the pH drifts too high or too low, certain nutrients get “locked out.” This means the plant will start showing signs of a deficiency even though the food is right there in the soil.
Managing pH isn’t as complicated as it sounds. Here’s the routine I follow:
- Get a pH Pen: First things first, invest in a decent digital pH pen. It’s an essential tool, not a luxury.
- Test Your Water: Before you do anything else, test the pH of your tap or filtered water.
- Adjust After Mixing: If you’re adding nutrients, always mix them into the water first, then test and adjust the pH of the final solution.
- Use pH Up/Down: A few drops of a pH adjuster solution is usually all it takes to dial your water right into that perfect range.
Getting this right from the very beginning prevents a whole host of confusing problems down the road. It ensures your plants can actually use the food you give them, leading to steady, healthy, and happy growth.
Finding the Sweet Spot for Light and Heat
Light and temperature are the two biggest signals you send your seedlings, telling them how to grow. Get this balance wrong, and you’ll run straight into some of the most common issues growers face. Too little light, and you get lanky, weak plants stretching for their lives. Too much, and they’ll stay stunted and refuse to budge.
The goal here is to create a “Goldilocks zone” where everything is just right. You’re basically trying to replicate a perfect, gentle spring day—warm but not hot, bright but not scorching. This stable, cozy environment tells your seedlings it’s safe to focus on building strong roots and stocky stems.
Setting Up the Perfect Lighting
Your seedlings are babies, and just like babies, they need gentle care. Blasting them with a high-intensity lamp is like making them stare directly into the sun. It’s way too much and will quickly lead to light burn, which looks like crispy, yellowed leaves.
You don’t need a thousand-dollar light for this stage. In fact, simpler, lower-intensity options work much better.
- CFLs (Compact Fluorescent Lights): These are cheap, run cool, and are fantastic for seedlings. You can get them just a few inches from the canopy without any risk of burning them.
- T5 Fluorescent Tubes: Another one of my favorite choices. T5s give you a soft, even light that’s perfect for covering a whole tray of new plants.
- Dimmable LEDs: If you’re working with a powerful LED, just dial it back. Setting it to 25-50% intensity gives you precise control without overwhelming the little ones.
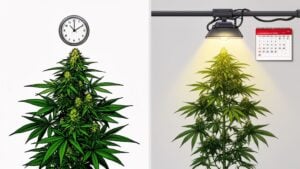
Consistency is everything. A standard 18 hours on, 6 hours off light cycle gives them plenty of energy to grow without pushing them too hard. For a deeper dive into different lighting strategies, check out our complete guide to the best cannabis light schedule for seedlings.
Remember, the goal isn’t raw power. It’s about providing a gentle, consistent light source that encourages seedlings to grow wide and strong, not tall and weak.
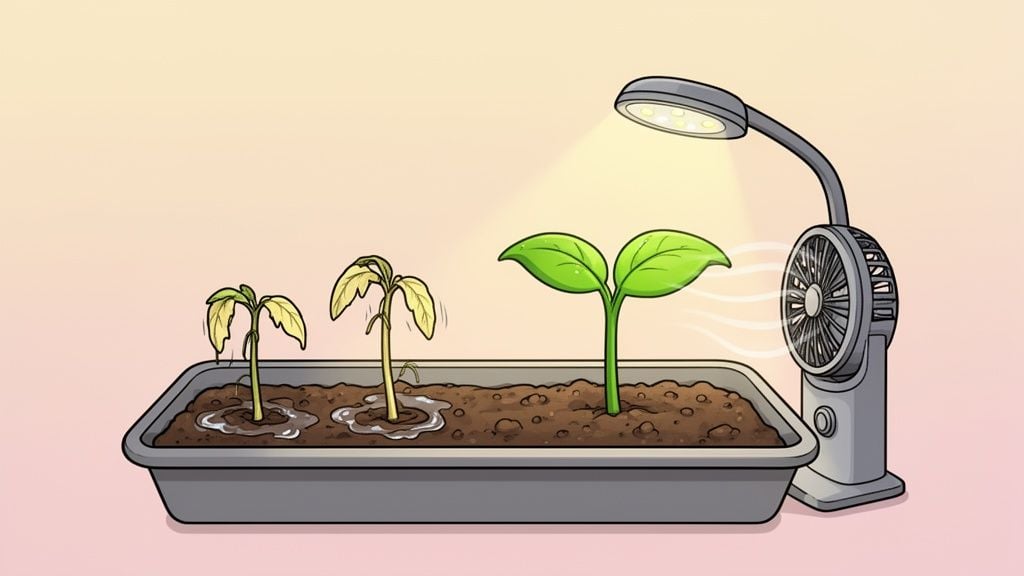
Why Seedlings Get Leggy and How to Fix It
Let’s talk about “stretching”—one of the most frequent problems I see. A leggy seedling is a dead giveaway that your light source is either too far away or too weak. The plant literally stretches its stem, desperately trying to get closer to the light. This leaves you with a long, skinny, and fragile plant that’s likely to just fall over.
Thankfully, the fix is pretty simple: move the light closer. With CFLs, you can get as close as 3-4 inches. For T5s and dimmed LEDs, I usually start around 12-18 inches away and adjust from there. A good rule of thumb is the “hand test.” Place the back of your hand at the top of your seedlings—if the light feels uncomfortably warm, it’s too close.
If a seedling has already stretched out, don’t panic. You can still save it.
- Move the Light Closer: First thing’s first. Stop any more stretching immediately.
- Create a Gentle Breeze: A small oscillating fan forces the stems to wiggle and dance, which is great for strengthening them.
- Bury the Stem: This is my favorite trick. When you transplant the seedling to a bigger pot, just bury a good portion of that lanky stem. New roots will sprout from it, creating a much stronger, more stable foundation for the plant.
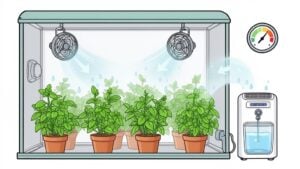
Dialing in Temperature and Humidity
Just as important as light is the climate you create. Seedlings absolutely thrive in warm, humid conditions, kind of like a tiny greenhouse. I aim for a temperature between 70-78°F (21-26°C) and keep the relative humidity around 65-75%.
Sudden temperature drops, especially at night when the lights are off, can shock the seedlings and bring growth to a grinding halt. If your grow space gets chilly, a simple seedling heat mat under the tray is a game-changer. It provides the consistent, gentle warmth the roots crave.
Using a humidity dome for the first week or so is a fantastic way to lock in moisture. Just be sure to lift it off for a few minutes each day to let some fresh air circulate. Keeping this environment stable takes the stress off your plants and lets them put all their energy right where it belongs: into healthy, vigorous growth.
Ready to start your growing journey on the right foot with genetics you can trust? At Growers Choice Seeds, we provide premium, lab-tested cannabis seeds with a 90% germination guarantee. Browse our collection of over 500 strains, including beginner-friendly autoflowers and high-yield feminized options, and get the support you need to succeed. https://www.growerschoiceseeds.us
FAQs
Can I Save a Stretchy or Leggy Seedling?
Yes, you absolutely can, and it’s easier than you might think! A “leggy” seedling with a long, skinny stem isn’t sick; it’s just desperately reaching for more light. This is a dead giveaway that your grow light is too far away or isn’t strong enough.
The immediate fix is to lower your light, but do it gradually so you don’t scorch the plant. A gentle breeze from a small fan will also work wonders. The constant movement encourages the stem to thicken and strengthen itself.
But the real magic happens when you transplant. You can solve the problem for good by simply burying a good portion of that lanky stem when you move the seedling to its next pot. The buried section will sprout new roots, giving you a much more stable, robust base for your plant.
What Do the First Real Leaves Tell Me About Plant Health?
Those first jagged-edged leaves that show up after the round “starter” leaves (the cotyledons) are your first real window into the plant’s health. They should be a vibrant, even green.
If they come in looking pale or yellow, it’s probably not a nutrient deficiency yet. It’s far more likely to be a sign of overwatering or a pH issue that’s preventing the seedling from absorbing the food that’s already in the soil.
On the other hand, if the very tips are brown and crispy, that’s a textbook sign of nutrient or light burn. Any weird twisting, spots, or deformities could point to pH swings or even the first signs of pests. Watching these first true leaves closely lets you fix small cannabis seedling problems before they become big headaches.
My Seedling Sprouted but Has Stopped Growing. What’s Wrong?
This one stumps a lot of people: a sprout pops up, looks great for a day or two, and then just… stops. A growth stall like this is almost always an environmental problem.
The number one reason for a plant going dormant is cold temperatures. Seedlings need warmth to thrive, ideally somewhere between 70-78°F (21-26°C). If your grow space is chilly, their metabolism slows to a crawl.
Overwatering is another huge factor that can bring growth to a dead stop. Constantly wet soil robs the roots of the oxygen they need to expand, effectively hitting the pause button on the plant. Finally, take a look at your growing medium. If it’s too dense or packed with “hot” nutrients, the delicate roots just can’t push through. Check your temps, go easy on the water, and make sure you’re using a light, fluffy seedling mix.
When a seedling stalls, think of it as a quiet protest. It’s not dying—it’s just telling you its living conditions aren’t right for growth. Your job is to figure out which basic need—warmth, oxygen, or room to grow—is missing.