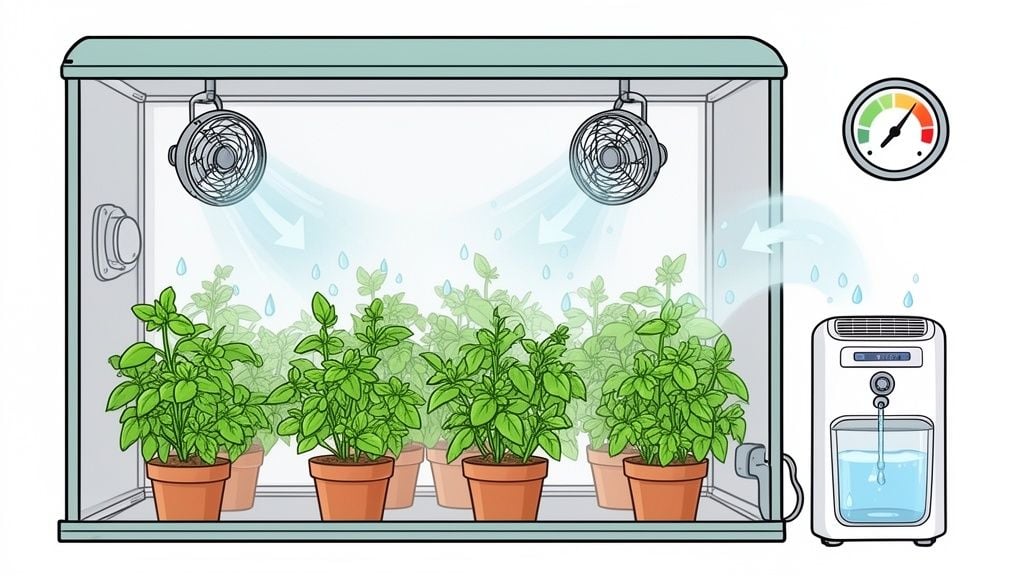
When you unzip your grow tent and a wall of thick, humid air hits you in the face, you know you’ve got a problem. The most effective way to lower humidity in a grow tent comes down to two main strategies: cranking up the air exchange with fans and actively pulling moisture from the air with a dehumidifier. Getting these two things right is your best defense against a damp environment that can ruin a harvest.
Why High Humidity Is a Deal-Breaker for Your Grow
Your plants are always releasing water vapor into the air through their leaves in a process called transpiration. If that moist air gets trapped in the tent, it settles on everything—leaves, stems, and most importantly, your developing buds. This is especially risky during the flowering stage when the buds are dense and have lousy airflow.
Pinpointing the Source of the Problem
So where is all this moisture coming from? It’s usually not one single thing but a few common missteps that add up. Figuring out the “why” is crucial because it lets you fix the root cause instead of just treating the symptoms.
Here’s what I see most often in swampy tents:
- Weak Air Exchange: Your exhaust fan might be too small for your tent, or you don’t have enough small fans inside to keep air moving around the plants. Remember, still air is wet air.
- Overwatering: It’s a classic rookie mistake. When you drench your plants, the excess water in the soil has nowhere to go but up, evaporating right back into the tent’s air.
- Crowded Canopy: We all want to maximize our space, but cramming too many plants together is a recipe for high humidity. More plants mean more transpiration, creating a dense, damp microclimate.
- The “Lung Room” Environment: The air your tent pulls in comes from the room it’s sitting in. If your tent is in a damp basement, you’re starting the fight with one hand tied behind your back.
High humidity is no joke—it’s the ideal breeding ground for powdery mildew and the dreaded bud rot (Botrytis). Once these fungal diseases get a foothold, they spread fast and can make your entire crop worthless. Learning how to spot them early is key; you can find great info on common cannabis diseases and pests to stay ahead of the game.
At the end of the day, controlling humidity is about more than just watching a number on a display. It’s about building a stable, healthy world where your plants can thrive and reach their full potential, free from the threat of mold. Let’s dive into exactly how to dial in your environment.
Your First Line of Defense: Mastering Airflow
Before you even think about dropping cash on a dehumidifier, let’s talk about the most powerful—and cheapest—tool you have: air. Getting your airflow dialed in is non-negotiable. It’s the foundation of a healthy grow and your very first move when tackling humidity.
Think of your grow tent as a set of lungs. Your plants are constantly “exhaling” water vapor through transpiration. If that damp, stagnant air has nowhere to go, it just hangs around, creating the perfect storm for problems. This is why a proper ventilation system isn’t just a nice extra; it’s absolutely essential.
The Magic of Negative Pressure
The real goal isn’t just to blow air around aimlessly. You want to create a constant cycle of air exchange, pulling old, humid air out while bringing fresh, drier air in. The most effective way to do this is by creating what’s known as negative pressure.
It sounds technical, but the concept is dead simple. You just need an exhaust fan that’s slightly more powerful than your intake. This setup ensures you’re pulling more air out of the tent than you’re bringing in, which causes the tent walls to suck in just a little.
Quick Check: Look at the sides of your tent. Are they bowing inward slightly? If so, you’ve nailed it. This gentle vacuum effect guarantees that stale, humid air is being constantly removed and replaced.
This continuous exchange is your best defense against mold and mildew, especially when your plants are in late flower and the colas are dense.
Your Exhaust Fan is the MVP
Your exhaust fan is the engine of your entire ventilation system. It needs to be positioned high up in the tent because hot, humid air naturally rises. Its one job is to suck that problem air up and vent it completely out of the tent—and ideally, out of the room your tent is in.
Running this fan 24/7 is not optional. I’ve seen too many growers make the mistake of putting their exhaust fan on the same timer as their lights. This is a direct invitation for mold to set up shop overnight, right when temperatures drop and humidity spikes.
For anyone serious about their setup, understanding the basics of growing cannabis indoors starts with mastering environmental controls like this.
Don’t Forget Internal Circulation
While your exhaust fan handles the heavy lifting, you still need to deal with microclimates inside the tent. These are little pockets of stagnant, humid air that love to form under the canopy or between dense foliage. This is where oscillating fans come into play.
You’re not trying to create a wind tunnel. Blasting your plants with a harsh, direct wind will only cause windburn and stress them out. The goal is a gentle, rolling breeze that keeps the leaves rustling ever so slightly.
Here are a few placement tips I’ve learned over the years:
- One Above, One Below: Place one fan above the canopy, angled down, to move the hot air that builds up under your grow lights.
- Target the Base: Put a second, smaller fan below the canopy, aimed toward the lower stems. This breaks up the humid air trapped by lower leaves and helps dry the soil surface.
- Create a Vortex: In larger tents, using multiple fans to create a gentle circular airflow works wonders. It ensures every corner gets consistent air movement, leaving no dead zones for humidity to settle.
By getting your airflow right with a strategic mix of exhaust and oscillating fans, you create an environment where high humidity simply can’t get a foothold. It’s often all you need to keep your RH in the sweet spot, ensuring your plants stay healthy and your harvest is heavy and mold-free.
Choosing and Using a Dehumidifier Like a Pro
So you’ve tweaked your fans and improved your airflow, but the humidity is still creeping up. This is where a dehumidifier becomes your most valuable player. For many growers, especially those in humid climates or deep into the flowering stage, it’s not a luxury—it’s essential.
A dehumidifier doesn’t just push damp air around like a fan; it actively pulls moisture out of the environment. It’s the ultimate tool for dialing in your grow tent’s conditions and protecting your buds when they’re most vulnerable.
Sizing Your Dehumidifier the Right Way
First things first: that tiny desktop unit you saw on Amazon won’t make a dent in a 4×4 tent full of transpiring plants. When you’re shopping for a dehumidifier, the spec that matters most is its “pint” rating. This tells you exactly how many pints of water the machine can pull from the air in 24 hours.
For a smaller tent, say a 2×2 or 2×4, a 20- to 30-pint model can often do the job. But for common setups like a 4×4 or 5×5 tent, you really need to be looking in the 30- to 50-pint range, particularly if your plants are large and leafy. If you go too small, the unit will run nonstop without ever reaching your target humidity, wasting electricity and failing to protect your crop.
The impact of a properly sized dehumidifier is massive. Did you know that deploying a high-quality unit can slash humidity levels by up to 30-40% during the critical late flowering stage? This directly boosts yields by preventing the kind of devastating crop losses from bud rot and powdery mildew that plagued early home growers. For U.S. growers using premium genetics like those from Growers Choice Seeds, maintaining that ideal 30-40% RH in late flower is non-negotiable for getting the dense, high-THC buds you’re after. Find out more from expert growers about balancing your grow tent’s environment.
Inside vs. Outside the Tent: A Heated Debate
The next puzzle is where to put the thing. You’ve got two choices, and each has some serious trade-offs.
Option 1: Placing it Inside the Tent
- Pros: It’s the most direct approach. The dehumidifier is right at the source of the problem, pulling moisture directly from your plant’s environment. It’s simple and effective.
- Cons: Dehumidifiers produce heat. Sticking a heat-generating appliance in an already warm tent can easily push your temps into the red zone. They also hog valuable floor space.
Option 2: Placing it Outside the Tent
- Pros: This completely sidesteps the heat problem. By putting the unit in your “lung room” (the room your tent is in), you treat the air before your intake fan pulls it in. This helps keep your tent’s temperature perfectly stable.
- Cons: It’s a less direct method. You’re now dehumidifying an entire room, so the unit will work harder. This strategy only works if the lung room is reasonably well-sealed.
For most growers, placing the unit outside the tent is the smarter play if your space allows it. It gives you much better control over your tent’s temperature, which is every bit as critical as humidity.
Pro Tips for Maximum Efficiency
Just plugging in a dehumidifier and hoping for the best isn’t going to cut it. You have to use it strategically to get the best results for your plants and your power bill.
-
Target the “Lights Off” Period: Humidity always spikes when the grow lights switch off and the temperature drops. I set my dehumidifier on a timer to kick on about 30 minutes before lights-out and run through the entire dark period. This preemptive strike stops high humidity before it ever becomes a problem.
-
Position for Success: If you have to put the unit inside the tent, don’t just jam it in a corner. Elevate it on a small stool or crate so it can breathe. Make sure its intake and exhaust vents are clear, and try to aim the dry air output towards an oscillating fan to circulate it evenly.
-
Automate with a Humidistat: The best units come with a built-in humidistat. This is a game-changer. You just set your target RH (say, 45%), and the machine will cycle on and off automatically to maintain it. It’s far more efficient than running it 24/7.
-
Drainage is Key: Trust me, emptying a water collection bucket multiple times a day gets old fast. Look for a model that has a continuous drain hose port. You can run the hose to a larger bucket or a floor drain and pretty much forget about it.
A good dehumidifier is an investment, but it’s one that can pay for itself in a single run by saving your crop from a mold disaster. It’s the final piece of the environmental control puzzle.
Smart Growing Habits That Keep Humidity Down
While fans and dehumidifiers are the heavy-duty tools in your arsenal, the real secret to winning the humidity war lies in your day-to-day routine. It’s easy to overlook, but your cultivation habits have a massive impact on the environment inside your tent.
Think of it like this: technology can fix a humidity problem, but smart habits can prevent it from ever starting. These small, consistent adjustments add up to a stable environment where your plants can truly flourish. And the best part? They don’t cost a thing.
Master Your Watering Game
One of the biggest culprits of runaway humidity is the very thing your plants need to live: water. It’s a classic rookie mistake to overwater, which turns your growing medium into a miniature swamp that constantly pumps moisture into the air. The trick is to water smarter, not harder.
The absolute best time to water your plants is right after the grow lights kick on. This gives the heat from the lights and the circulating fans the entire “day” to help evaporate excess moisture from the soil’s surface. Watering right before lights-out is asking for trouble—that water just sits in the cool, dark tent all night, sending your relative humidity (RH) through the roof.
Here’s a simple gut-check I use: wait until the top 1-2 inches of soil are bone dry before even thinking about watering again. Then, lift the pot. A light pot is a thirsty pot. This one move prevents overwatering and keeps your roots healthy and safe from rot.
If you’re still trying to get the hang of it, you might want to check out this in-depth guide on when to water weed plants for perfect plant health.
Give Your Plants a Haircut
Your cannabis plants are basically little humidifiers themselves. They constantly release water vapor through their leaves in a process called transpiration. More leaves mean more transpiration, which means—you guessed it—more humidity. This is where strategic pruning, or defoliation, becomes your best friend.
Defoliation is simply the act of removing large, unnecessary fan leaves, especially those in the lower and middle parts of the canopy that aren’t getting much light anyway.
This is a game-changer for humidity control for a few reasons:
- Less Transpiration: By removing some of the plant’s “lungs,” you directly cut down on the amount of water vapor it can release.
- Better Airflow: A thinned-out canopy allows your fans to push air through the plant, not just around it. This is crucial for breaking up pockets of stagnant, humid air that get trapped in dense foliage.
- More Light to Buds: As a bonus, getting those big fan leaves out of the way allows more light to hit the lower bud sites, helping them fatten up.
Now, don’t go crazy and strip your plants bare—they still need leaves for photosynthesis. A good approach is to remove a few leaves every couple of days during late veg and early flowering, focusing only on the ones blocking prime bud sites or airflow.
The Art of Lollipopping
Lollipopping is a more aggressive pruning technique that takes defoliation a step further. It involves removing all the lower branches and bud sites that are destined to become “larf” or “popcorn buds.”
The whole point is to focus the plant’s energy on the main colas up top, where you’ll get the highest-quality flower. By clearing out the entire bottom third of the plant, you create an incredibly open and airy space at the base. This drastically improves air circulation right where moisture loves to hide.
This technique is usually done right before you flip your plants to flower. When you combine lollipopping with regular defoliation, you create a plant structure that’s not only more productive but also naturally resistant to high humidity. These habits will help you shape an environment that works with you, not against you.
Troubleshooting Stubborn Humidity Problems

So, you’ve followed all the advice. You’ve got fans creating a nice breeze, a dehumidifier humming away, and your watering schedule is on point. Yet, you glance at your hygrometer, and the numbers are still stubbornly high. What’s going on?
This is the point where a lot of growers get frustrated, but don’t give up. When the usual fixes aren’t cutting it, you have to put on your detective hat. The issue isn’t always what’s happening inside the tent. Often, the real culprit is the environment just outside of it or even the gear you’re relying on.
Your Lung Room is Sabotaging You
First, let’s look at your “lung room”—that’s the room your grow tent is physically located in. Every second, your tent’s intake fan is pulling air from this space. If that lung room is a damp basement or a humid laundry room, you’re just pumping that wet air directly onto your plants. You’re essentially trying to dry a puddle in the middle of a rainstorm.
Your fans and dehumidifier are left fighting an uphill battle they can never win. The fix is to stop treating the tent and start treating the room.
- Move the Dehumidifier: If your dehumidifier is currently inside the tent, take it out. Place it in the lung room and let it run. The goal is to dry the air before it ever gets pulled into your grow space.
- Ventilate the Room: Can you crack a window in the lung room or run an air conditioner? Anything you can do to lower the ambient humidity of the surrounding area will have a huge impact inside the tent.
You could have the most powerful exhaust fan money can buy, but if it’s pulling in air that’s already at 75% RH, you’ll never get your tent down to the 45% RH you need for flowering. Fixing the lung room is often the single most effective way to solve persistent humidity issues.
The Lights-Out Humidity Spike
This is a classic problem. The moment your grow lights click off, the temperature drops. Since cooler air can’t hold as much moisture, the relative humidity shoots skyward, sometimes jumping 20% or more. This is prime time for powdery mildew and bud rot to set in.
Your plants don’t just stop breathing when the lights go out. They continue transpiring, releasing moisture into the cooling air and creating a dangerously damp environment. You have to get ahead of this with automation.
The trick is to set your dehumidifier on a timer. Program it to kick on about 30 minutes before your lights are scheduled to turn off and let it run through the entire dark period. This proactive approach pulls moisture out of the air as the temperature falls, stopping that humidity spike before it even starts.
Is Your Equipment Lying to You?
Before you rush out and buy a bigger fan or a second dehumidifier, take a hard look at the tools giving you your data. That little hygrometer measuring your temperature and humidity could be the real problem.
I’ve seen cheap, uncalibrated hygrometers be off by a staggering 10-15%. You could be panicking over a reading of 65% RH when your actual humidity is a perfectly acceptable 55%. Or, even worse, it could be reading low, giving you a false sense of security while mold is quietly setting up shop.
Invest a few extra dollars in a quality digital hygrometer and calibrate it if you can. It’s a small price to pay for accurate data—the very foundation of every decision you make. While you’re at it, double-check your exhaust fan’s CFM (cubic feet per minute) rating. An underpowered fan just can’t move enough air to keep up, no matter what else you do.
Ready to grow genetics that thrive in a perfectly dialed-in environment? At Growers Choice Seeds, we offer over 500 lab-tested cannabis strains designed for maximum yield and potency. With a 90% germination guarantee and discreet shipping across all 50 states, you can start your next grow with total confidence. Find your perfect strain today at https://www.growerschoiceseeds.us.
FAQs
How Often Should My Exhaust Fan Be Running to Control Humidity?
Your exhaust fan should be running 24/7. Full stop. I really can’t say this enough.
Consistent air exchange is your absolute number one defense against stale, humid air. Think of it as your tent’s lungs—they need to be breathing all the time. Your fan should be powerful enough to exchange all the air in your tent at least once every one to three minutes.
If it seems too powerful or is just too loud, don’t turn it off. Get a simple fan speed controller and dial it down. The key is to never shut it off completely, especially during the lights-off period. That’s when humidity spikes and the real damage from mold and mildew begins.
Does Cranking Up the Heat Help Lower Humidity?
Technically, yes, but it’s a dangerous game to play. Warmer air can hold more moisture, so raising the temperature will make your relative humidity (RH) reading drop. That’s just basic physics.
The problem is, you’ll likely push your tent’s temperature way out of the sweet spot for cannabis, which is generally 70-85°F. Running your plants too hot invites a whole new set of problems. It stresses them out, can bake off your precious terpenes, and is basically an open invitation for pests like spider mites to move in.
Your best bet is to focus on proper air exchange and a good dehumidifier. Don’t try to fix one problem by creating another.
Can I Just Use Desiccants Like DampRid Instead of a Dehumidifier?
You can, but honestly, it’s like using a bucket to fight a house fire. It’s just not the right tool for the job.
Products like DampRid or those little silica gel pouches are what we call passive dehumidifiers. They just sit there and slowly soak up whatever moisture is right next to them. For a tiny seedling closet, they might knock the RH down a point or two. But for a tent full of transpiring plants? No chance. They simply can’t keep up with the constant moisture being pumped into the air, especially during flower.
For any serious grow, an active electric dehumidifier is non-negotiable. It’s the only way to reliably pull enough water from the air to keep your plants happy and prevent bud rot.